Table of Contents
Get ready to shake your maracas and heat up the oven! When the month of May rolls around, there is no better way to celebrate than with a vibrant, colorful, and delicious batch of Cinco de Mayo cookies. Whether you are hosting a large fiesta or just want to treat your family to some festive sweets, learning how to decorate these treats is a creative journey that anyone can master. From bright piñatas to intricate sugar skulls and classic sombreros, these cookies serve as the perfect edible canvas for your artistic expression. In this guide, we will walk through everything you need to know to create professional-looking Cinco de Mayo cookies that taste even better than they look.
Why This Recipe Works
The beauty of these Cinco de Mayo cookies lies in the balance between a sturdy, buttery base and a smooth, sweet royal icing finish. This recipe works because we use a specific no-spread sugar cookie dough. There is nothing more frustrating than cutting out a perfect cactus shape only for it to turn into a blob in the oven! By controlling the leavening agents and chilling the dough, we ensure crisp edges every time.
Furthermore, this decorating tutorial utilizes a “flood and detail” method. This approach allows beginners to achieve that professional, high-gloss finish seen in boutique bakeries without needing years of experience. By using a single consistency of icing or a simple two-step process, your Cinco de Mayo cookies will have depth, texture, and vibrant colors that pop against any dessert table spread. It is a fantastic project for kids and adults alike, making it a staple for your spring holiday celebrations.
Ingredients
To make the perfect Cinco de Mayo cookies, you will need to gather high-quality ingredients for both the cookie base and the royal icing topping.
For the Sugar Cookies:
- 1 cup unsalted butter, softened to room temperature
- 1 cup granulated white sugar
- 1 large egg, room temperature
- 1 ½ teaspoons pure vanilla extract (or almond extract for extra flavor)
- 3 cups all-purpose flour, sifted
- ½ teaspoon baking powder
- ¼ teaspoon salt
For the Royal Icing:
- 4 cups powdered sugar, sifted
- 3 tablespoons meringue powder
- 5-7 tablespoons warm water (adjusted for consistency)
- 1 teaspoon clear vanilla extract
- Gel food coloring (bright pink, orange, yellow, teal, and lime green)
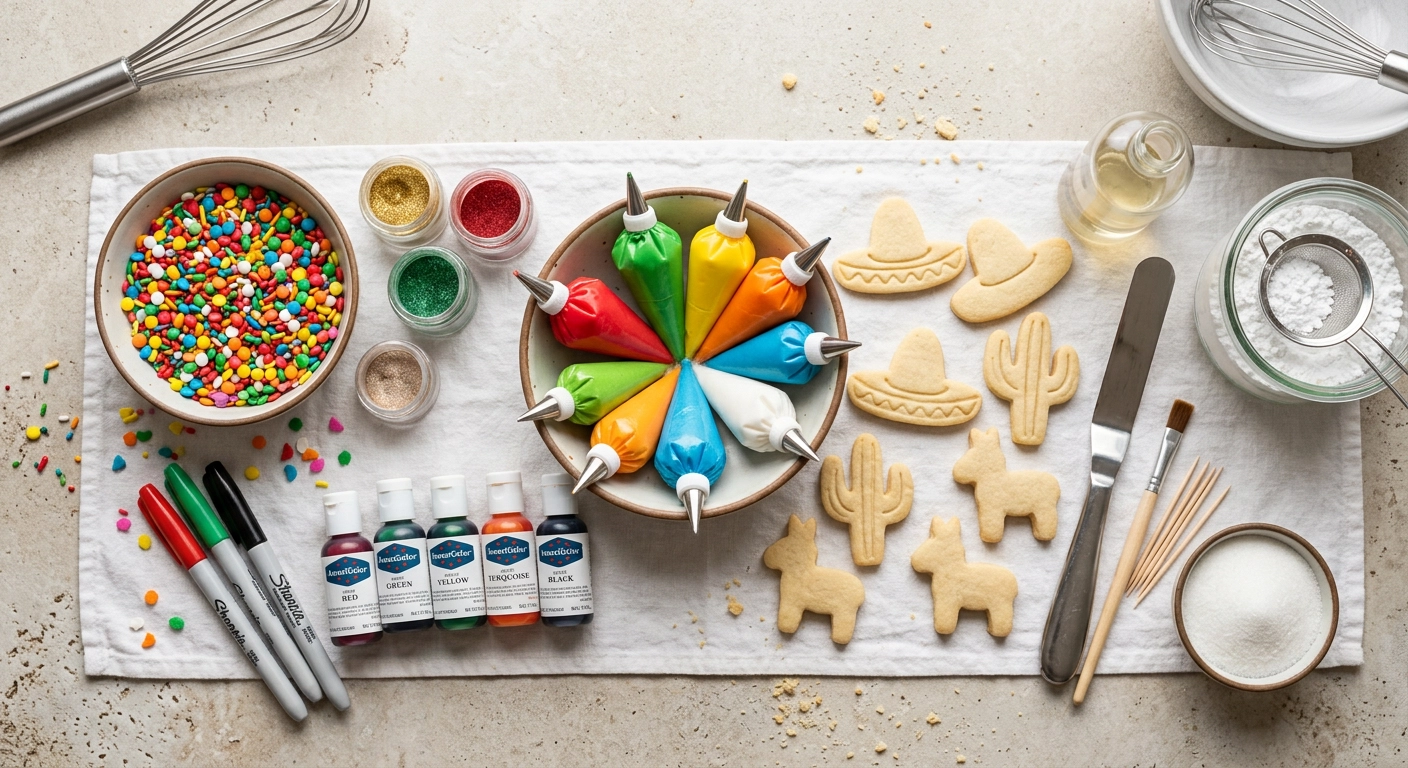
Equipment
Having the right tools is half the battle when it comes to cookie decorating. Make sure you have these items on hand before you start your Cinco de Mayo cookies project:
- Rolling pin with thickness rings (optional, but helpful for evenness)
- Cinco de Mayo themed cookie cutters (sombreros, cacti, piñatas, chili peppers)
- Large baking sheets and parchment paper
- Electric hand mixer or stand mixer
- Piping bags (disposable or reusable)
- Small piping tips (Round #1 or #2) or just snip the ends of the bags
- Scribe tool or toothpicks for popping air bubbles
- Small bowls for mixing different icing colors
Step by Step Guide
Follow these steps carefully to ensure your Cinco de Mayo cookies turn out perfectly.
1. Prepare the Cookie Dough
Cream together the softened butter and sugar until smooth and fluffy. Beat in the egg and vanilla extract. In a separate bowl, whisk the flour, baking powder, and salt. Gradually add the dry ingredients to the wet ingredients until a stiff dough forms. For more tips on dough handling, check out our internal link for basic baking techniques.
2. Roll and Cut
Roll the dough between two sheets of parchment paper to about 1/4 inch thickness. Chill the rolled dough in the fridge for at least 30 minutes. Once chilled, use your festive cutters to cut out shapes. Place them on a parchment-lined baking sheet.
3. Bake and Cool
Bake at 350°F (175°C) for 8-10 minutes. The edges should be set but not browned. Allow the cookies to cool completely on a wire rack. This is crucial; icing will melt on a warm cookie!
4. Mix the Royal Icing
Whisk together powdered sugar and meringue powder. Add water and vanilla, beating on medium speed until the icing forms soft peaks. Divide the icing into separate bowls and add gel food coloring to reach those iconic fiesta shades.
5. Decorating: The Outline and Flood
Using a slightly thicker icing (toothpaste consistency), outline your Cinco de Mayo cookies. Immediately follow with a thinner version of the same color (honey consistency) to fill in the centers. Use a scribe tool to smooth the surface. Let the base layer dry for at least 4 hours.
6. Adding Festive Details
Once the base is dry, use your thicker icing to add details like stripes on the piñata, prickles on the cactus, or colorful patterns on the sombrero. For inspiration on color theory in food, you can visit this external link.
To Incorporate With
Cinco de Mayo cookies are the stars of the show, but they love company! Pair these sweet treats with a refreshing glass of horchata or a zingy lime margarita. If you are hosting a full dinner, serve these after a meal of street tacos or chicken enchiladas. They also look beautiful when placed in a gift basket alongside some Mexican chocolate disks and a festive tea towel.
Varieties / Substitutions
If you have dietary restrictions, you can still enjoy Cinco de Mayo cookies. For a gluten-free version, swap the all-purpose flour for a high-quality 1:1 gluten-free baking blend. If you prefer a less sweet option, try using a shortbread cookie base which has less sugar than a traditional sugar cookie. For those who find royal icing too difficult, you can achieve a similar (though less detailed) look using a simple glaze or even colorful buttercream frosting piped with a small star tip.
Tips for Success
To get the best results with your Cinco de Mayo cookies, remember these expert tips:
- Don’t Overwork the Dough: Over-mixing leads to tough cookies. Mix until just combined.
- Use Gel Colors: Liquid food coloring can change the consistency of your icing. Gel colors are concentrated and won’t thin out your royal icing.
- Let Them Dry: Humidity is the enemy of royal icing. If it’s a rainy day, use a fan or dehumidifier to help the icing set.
- Practice Piping: Before moving to the cookies, practice your lines and dots on a piece of wax paper.
10 FAQ
1. How long do Cinco de Mayo cookies stay fresh?
When stored in an airtight container, these cookies stay delicious for up to two weeks.
2. Can I freeze the decorated cookies?
Yes! Place them in a single layer in a freezer-safe container. Thaw them inside the container to prevent condensation from ruining the icing.
3. Why is my royal icing bleeding?
Bleeding usually happens if the icing is too wet or if you live in a very humid environment. Make sure your base layer is completely dry before adding dark colors on top.
4. Can I make the dough in advance?
Absolutely. You can store the raw dough in the fridge for 3 days or freeze it for up to 3 months.
5. What if I don’t have Mexican-themed cutters?
You can use a template! Draw your shapes on cardstock, cut them out, place them on the dough, and trace around them with a knife.
6. Is meringue powder safe?
Yes, it is a pasteurized dried egg white product and is much safer for icing than raw egg whites.
7. How do I get black or bright red icing?
These colors require a lot of pigment. Start with a cocoa-powder based icing for black, or let the red icing sit overnight to deepen in color.
8. My icing is too thin, how do I fix it?
Add more sifted powdered sugar, one tablespoon at a time, until it reaches the desired thickness.
9. My cookies spread in the oven, why?
Your butter might have been too soft, or you skipped the chilling step. Cold dough is the secret to sharp shapes.
10. Can I use store-bought frosting?
Standard store-bought frosting won’t harden like royal icing, so you won’t be able to stack the cookies, but they will still taste great!
Conclusion
Mastering the art of Cinco de Mayo cookies is a rewarding way to celebrate Mexican culture and heritage through baking. While the decorating process requires a little patience, the vibrant results are well worth the effort. These cookies are more than just dessert; they are conversation starters and festive decorations all rolled into one. Grab your piping bags, embrace the bright colors, and enjoy the process of creating something beautiful for your fiesta!